Welcome to The Warp Storm! 👋
While you're welcome to look around we recommend you login or register to get the full benefits of the site, allowing you to talk to our members and show off your work! =]
Paint jobs, conversions, terrain pieces... whatever you're working on!
  • User avatar
  • User avatar
  • User avatar
User avatar

James #1172

Custom Custom Custom
So now stuff has arrived I can't put this off any longer!!! Or find something else to do to avoid it because I'm scared.
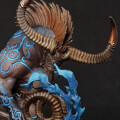
Plan is to end up with something like this
Image
I now have all the paints I need.. and all the weathering stuff I need. I have had to reorder one of the enamel washes and some new Matt varnish as I just don't trust the gloopy alklad stuff I have.
The contemptor is from eBay and I have reposed it as the stock pose is very pigeon toed and doesn't look very dynamic. A few months back I cut the right leg join and the waist section so it could look a little more like it was moving and not just standing there like a donut. Also the arms were magnetized too.
Today I have restuck on the Kromlech missile launcher (as the current rules stand it's always worth having the havoc launcher for an extra 6 points).
And I've used some of vallejo plastic putty to clean up the leg joins which were abit imperfect. I've also drilled the foot and stuck it to the base. Not sure why I did the mdf aswell.. seemed like a good idea at the time!!
Image
Also used one of my rubber brushes from China for the first time haha. Was quite good for this particular job to keep it smooth and get rid of excess. Normal brush can just texture the putty.
Image
Image
Image
Once dry next step will be prime it with new black I got. then use secret weapon orange rust all over. And do some highlights and low lights. And then I will need to hassle @Lovecraft0110 about the best way to use the ammo by mig scratches chipping fluid!!
Hobby Workshop
User avatar

pawl #1177

Custom Custom Custom
How did the build go, all smooth? And any plans to increase the Nurgle?
Want to get one of those rubber brushes too, they're meant to give a much smoother surface (even for a novice) than is easily achieved with traditional tools.
User avatar

James #1185

Custom Custom Custom
Yeah it went together absolutely fine. Apart from a bit gappy in those leg joins which I've tried to cover!! Very good for a cheap ebay purchase.
I'm planning on leaving this one as is and not nurgling it. Mainly because I love the look of the one photo from forgeworld above! But I do have 3 of these beasts. So potential to do others different. But I may do 1 for space wolves. Undecided yet. Will probably wait and see how the rules change for them in 9th and decide from there.
Yeah I was quite impressed with the rubber tools for a little play around. I think they'd be great with green stuff! I got them from eBay for maybe 2.50 for 5 from good ol China but I think they turned in less time than stuff from Spain somehow.
Also @pawl you impressed, my first miniature on a paper clip. Looking to the freedom this will afford on the base!
User avatar

pawl #1190

Custom Custom Custom
That's alright then, know that resin can be a nightmare at times!
That's alright, plenty of time for experimentation then.

I'm waiting on new GS to turn up, but I have some old stuff I can play with, see if I'm still useless before I go buying more.

I actually hadn't noticed the paperclip 😂 Do you have any plans for the base at all? While I'm assuming you were going for a walking pose I'm picturing the crushed remains of an enemy vehicle underneath the back foot 😁
User avatar

James #1193

Custom Custom Custom
Yeah in relative resin terms it was dream to work with tbf.

Hmm base wise I wasn't really sure. However I've recently ordered some resin miniature bricks... So I'm wondering about maybe building like a little wall for it to walk through... perhaps.. I always love the idea of open/burst pipes spilling water out too (any excuse to do more water effects stuff!!) Maybe a dead body in there too. I've got plenty of extra bits now I got my old box of stuff 🤣
User avatar

pawl #1204

Custom Custom Custom
As it happens that's not too dissimilar to an idea I've been mulling over for a dreadnought. 😂 I say mock it up to scale on a bit of paper (or build it with paper) and see if it fits. If it does then go for it!
User avatar

James #1226

Custom Custom Custom
@pawl when the bricks arrive I'll see if I can set it up using abit of blue tack.
Have you seen any examples of this? Keen to get some ideas.

@Lovecraft0110 can I pick your brains for this. I'm planning to tackle the contemptor in a similar fashion to Lhorke's droppod in your vids. One thing I'm not too sure about is when to varnish. So ok if I lay what I think my steps are and you correct me 😁
1) prime black
2) airbrush rust orange with some darker and lighter bits
3) apply ammo of mig scratches to all the parts that are going to be white and allow to dry.
4) spray entire model white and quickly do some airbrush highlights
5) scratches effect says leave for about 2 hours I think.. but not sure if that seems long relative to vids I've seen.. (I'll need to double check thaf)
Then use water to wet the surface and use a brush and interdental sticks to give scratched effect.
6) once fully dried apply Matt varnish.
7) repeat process on the areas to be green and then varnish
8) apply enamels and use enamel thinner to feather.
9) varnish
10) use streaking effect rust and enamel thinner
11) varnish
12) potentially use oilbrusher dust on the lower leg sections.
13) varnish again....

Does that sound about right?
User avatar

pawl #1227

Custom Custom Custom
James wrote: 12 Jul 20, 00:07 @pawl when the bricks arrive I'll see if I can set it up using abit of blue tack.
Have you seen any examples of this? Keen to get some ideas.
Not to hand I'm afraid, just vague memories of maybe seeing similar, and the fact that I liked the idea of attempting a base that's actually interesting 😂
If I come across anything then I'll send it your way though.
James liked this
User avatar

Lovecraft0110 #1247

Custom Custom
James wrote: 12 Jul 20, 00:07 @pawl when the bricks arrive I'll see if I can set it up using abit of blue tack.
Have you seen any examples of this? Keen to get some ideas.

@Lovecraft0110 can I pick your brains for this. I'm planning to tackle the contemptor in a similar fashion to Lhorke's droppod in your vids. One thing I'm not too sure about is when to varnish. So ok if I lay what I think my steps are and you correct me 😁
1) prime black
2) airbrush rust orange with some darker and lighter bits
3) apply ammo of mig scratches to all the parts that are going to be white and allow to dry.
4) spray entire model white and quickly do some airbrush highlights
5) scratches effect says leave for about 2 hours I think.. but not sure if that seems long relative to vids I've seen.. (I'll need to double check thaf)
Then use water to wet the surface and use a brush and interdental sticks to give scratched effect.
6) once fully dried apply Matt varnish.
7) repeat process on the areas to be green and then varnish
8) apply enamels and use enamel thinner to feather.
9) varnish
10) use streaking effect rust and enamel thinner
11) varnish
12) potentially use oilbrusher dust on the lower leg sections.
13) varnish again....

Does that sound about right?
Hey James,

Just read this and I was getting excited as I went. I love Contemptors, I love Death Guard...and I love rusty, weathered Dreadnoughts! So please, feel free to "hassle me" as much as you like.

There are a few things I would recommend you change in the steps above. Let me see:

1. After the rust undercoat, and before the chipping fluid, apply a matt varnish to protect the paint. Just two light coats.

2. Do NOT let the chipping fluid dry for two hours or you will have problems like the ones I had on the Terrax. Just apply the white as soon as it looks dry.

3. Do NOT allow the white to dry for very long either. I would say 30 minutes tops. Then start with the water, tough brushes, and interdental sticks.

4. Before the enamel washes, make sure to apply a GLOSS varnish, not matt.

5. You don't need to varnish between enamel washes and streaks - that is the same step for me.

6. Allow the enamels to dry before blending. There are people out there advising you to do this straight away - don't. Let it dry for an hour or so. Trust me, you will be able to blend it.

7. If you use the oilbrusher (which I would recommend), the area should not be gloss if you want to do oil dots. If it's a wash, then yes, gloss. They're different techniques.

Hmm...I have a feeling I'm forgetting something...maybe it'll come to me later. In any case, let me know if the above makes sense. The most important thing is the drying times and the gloss before enamels.
pawl liked this
User avatar

James #1257

Custom Custom Custom
@Lovecraft0110 this is great. Really appreciate it. I'll probably take it slow and keep updating here with my progress so if there's any thing you remember you can chip in 😊
Hoping to start tomorrow 😁😁😀 hopefully the vallejo Matt varnish will turn up!
  • 1
  • 2
  • 3
  • 4
  • 5
  • 10
Hobby Workshop